반응형
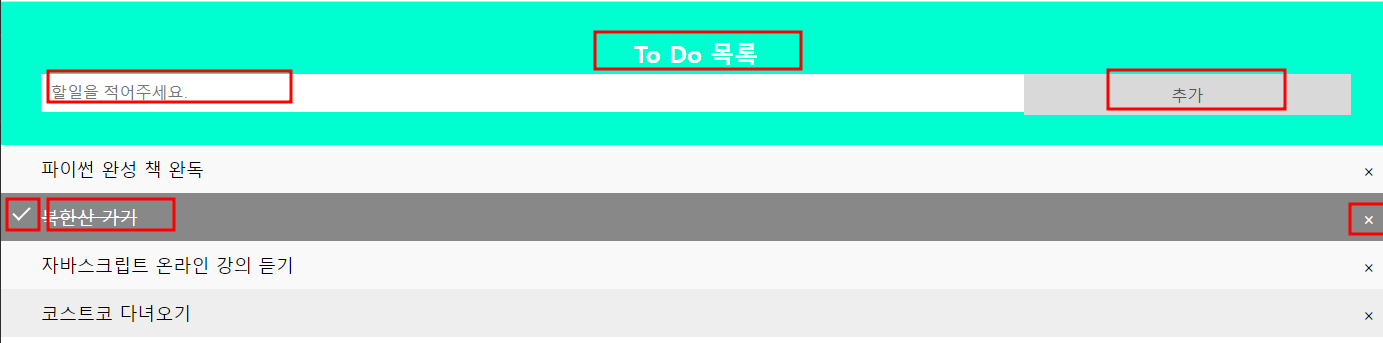
1. todo.html 을 아래처럼 보여 지도록 내용을 추가(Input 상자에 안내문구가 나올 수 있도록)
2. CSS를 추가하여 아래와 같이 보여지도록 함 Todo.html 문서의 css 적용
3. 추가가 클릭되면 아래 작성할 함수가 호출되도록 이벤트를 적용
4. 할일을 적어주세요 가 쓰여진 input 에 내용을 입력하고 추가을 누르면 항목이 추가 되도 록 javascript를 작성 추가된 후 input창은 다시 입력 받을 수 있도록 초기화 함. Input 상자에 값을 입력하지 않고 추가를 클릭하면 할일을 입력하세요 라는 alert을 뜨우기.
5. 완료, 완료 취소 하기- 항목을 클릭하면 취소선이 그어진다. 다시한번 클릭하면 취소선이 사라짐
6. 모든 항목에 x 버튼 붙이기
- CSS부분을 추가 또는 수정하여 x가 아래와 같이 보여 지도록 한다. - 동적으로 x를 모든 목록에 붙인다.
- 할 일을 새롭게 추가했을 때도 x가 붙어야 한다
HTML
  <div id="myDIV" class="header">
    <h2>To Do 목록</h2>
    <input type="text" id="myInput" placeholder="할일을 적어주세요." />
    <span class="addBtn">추가</span>
  </div>

  <ul id="myUL">
    <li>파이썬 완성 책 완독</li>
    <li class="checked">북한산 가기</li>
    <li>자바스크립트 온라인 강의 듣기</li>
    <li>코스트코 다녀오기</li>
  </ul>
CSS
    * {
      box-sizing: border-box;
    }

    body {
      margin: 0;
      min-width: 250px;
    }

    ul {
      margin: 0;
      padding: 0;
    }

    h2 {
      margin: 5px;
    }

    ul li {
      cursor: pointer;
      position: relative;
      padding: 12px 8px 12px 40px;
      list-style-type: none;
      background: #eee;
      font-size: 18px;
      transition: 0.2s;

      -webkit-user-select: none;
      -moz-user-select: none;
      -ms-user-select: none;
      user-select: none;
    }

    ul li:nth-child(odd) {
      background: #f9f9f9;
    }

    ul li:hover {
      background: #ddd;
    }

    ul li.checked {
      background: #888;
      color: #fff;
      text-decoration: line-through;
    }

    ul li.checked::before {
      content: "";
      position: absolute;
      border-color: #fff;
      border-style: solid;
      border-width: 0 2px 2px 0;
      top: 10px;
      left: 16px;
      transform: rotate(45deg);
      height: 15px;
      width: 7px;
    }

    .close {
      position: absolute;
      right: 0;
      top: 0;
      padding: 12px 16px 12px 16px;
    }

    .close:hover {
      background-color: #00ffd0;
      color: white;
    }

    .header {
      background-color: #00ffd0;
      padding: 30px 40px;
      color: white;
      text-align: center;
    }

    .header:after {
      content: "";
      display: table;
      clear: both;
    }

    input {
      margin: 0;
      border: none;
      border-radius: 0;
      width: 75%;
      padding: 10px;
      float: left;
      font-size: 16px;
    }

    .addBtn {
      padding: 10px;
      width: 25%;
      background: #d9d9d9;
      color: #555;
      float: left;
      text-align: center;
      font-size: 16px;
      cursor: pointer;
      transition: 0.3s;
      border-radius: 0;
    }

    .addBtn:hover {
      background-color: #bbb;
    }
JAVASCRIPT
    const myNodelist = document.getElementsByTagName("LI");
    //리스트에 X 가 생기게 하기 위한 코드입니다.
    //아래 문제를 해결하는데 참고 하세요.
    for (let i = 0; i < myNodelist.length; i++) {
      const span = document.createElement("SPAN");
      const txt = document.createTextNode("\u00D7");
      span.className = "close";
      span.appendChild(txt);
      myNodelist[i].appendChild(span);
    }


    let close = document.getElementsByClassName("close");

    for (let i = 0; i < close.length; i++) {
      close[i].onclick = function () {
        var div = this.parentElement;
        div.style.display = "none";
      };
    }

    const list = document.querySelector("ul");
    list.addEventListener("click", toggleChecked, false);

    function toggleChecked(e) {
      if (e.target.tagName === "LI") {
        e.target.classList.toggle("checked");
      }
    }

    //3. class 가 addBtn 인 span에 click 이벤트를 등록해 주세요.
    let addBtn = document.querySelector('.addBtn');
    addBtn.addEventListener('click', newElement, false);
    //4. 추가가 클릭되면 목록에
    function newElement() {
      const li = document.createElement("li");
      const inputValue = document.getElementById("myInput").value;
      const t = document.createTextNode(inputValue);
      li.appendChild(t);
      if (inputValue === "") {
        alert("할일을 입력하세요!!");
      } else {
        document.getElementById("myUL").appendChild(li);
      }
      document.getElementById("myInput").value = "";

      // 새롭게 내용이 추가된 후 x 버튼을 붙인다.
      const span = document.createElement("SPAN");
      const txt = document.createTextNode("\u00D7");
      span.className = "close";
      span.appendChild(txt);
      li.appendChild(span);

      for (let i = 0; i < close.length; i++) {
        close[i].onclick = function () {
          let div = this.parentElement;
          div.style.display = "none";
        };
      }
}'경기도 인공지능 개발 과정 > 과제' 카테고리의 다른 글
| Python 숫자야구 만들기 (0) | 2022.05.29 |
|---|---|
| Python 초보자를 위한 파이썬 300제 (101 ~ 200) (0) | 2022.05.28 |
| Python 초보자를 위한 파이썬 300제 (21 ~ 100) (0) | 2022.05.18 |
| Python 초보자를 위한 파이썬 300제 (1 ~ 20) (0) | 2022.05.17 |
| SQL 과제 - 팀별 SQL퀴즈 풀기 (0) | 2022.04.23 |