회사 프로젝트 진행 시, Docker는 더이상 선택사항이 아닌, 필수사항인거 같다. 거기에 쿠버네티스나 docker-compose와 같이 Docker들을 관리할 수 있는 시스템은 얹을 뿐...,
분산 시스템 환경에서 대규모 컨테이너를 다룬다면 쿠버네티스가 최적의 선택지 이지만, 설치 뿐 아니라 관리가 만만치 않다는 단점이 있다. 그에 반해 docker swarm을 기반한 docker service을 이용한다면 쿠버네티스보다는 유연성은 떨어지지만, 관리 및 구현 난이도가 상대적으로 간단하기 때문에 대규모 시스템이 아니면 충분히 매력적인 선택지 이다.
이번 프로젝트에서 YOLOV5 서버를 구축하는 역할을 맡았다.
inference를 사용할 inference.py를 작성하고 (yolov5의 detect.py에서 inference 부분을 떼다가 작성했다.)
import argparse
from copy import deepcopy
import json
import os, sys
import shutil
from pathlib import Path

import torch
FILE = Path(__file__).resolve()
ROOT = FILE.parents[0]  # YOLOv5 root directory
if str(ROOT) not in sys.path:
    sys.path.append(str(ROOT))  # add ROOT to PATH
ROOT = Path(os.path.relpath(ROOT, Path.cwd()))  # relative
if str(ROOT) not in sys.path:
    sys.path.append(str(ROOT))
# import torch.backends.cudnn as cudnn
# os.environ["OPENCV_FFMPEG_CAPTURE_OPTIONS"] = "rtsp_transport;udp"
from models.common import DetectMultiBackend
from datetime import datetime, timedelta
import time

from utils.general import (
    LOGGER,
    Profile,
    check_file,
    check_img_size,
    check_imshow,
    check_requirements,
    colorstr,
    cv2,
    increment_path,
    non_max_suppression,
    print_args,
    strip_optimizer,
    xyxy2xywh,
)
from utils.torch_utils import select_device, smart_inference_mode, time_sync
from utils.augmentations import Albumentations, augment_hsv, copy_paste, letterbox, mixup, random_perspective
from utils.dataloaders import IMG_FORMATS, VID_FORMATS
import numpy as np
import time
# import nvidia_smi
class YoloV5:

    def __init__(self):
        self.device= ''  # cuda device, i.e. 0 or 0,1,2,3 or cpu
        self.weights = ['model/best_safety.engine']
        self.dnn=False
        self.data = 'data.yaml'
        self.half = True
        self.imgsz=(832, 832)
        # self.video_path = '/usr/src/app/vol/Unit10-Boiler-1F-98.mp4'
        self.source = ''
        self.auto = False
        self.stride = 32
        self.augment = False
        self.conf_thres=0.25
        self.iou_thres=0.45
        self.classes=None
        self.agnostic_nms=False
        self.max_det=1000
        self.is_url = self.source.lower().startswith(('rtsp://', 'rtmp://', 'http://', 'https://'))
        self.is_file = Path(self.source).suffix[1:] in (IMG_FORMATS + VID_FORMATS)
        self.webcam = self.source.isnumeric() or self.source.endswith('.streams') or (self.is_url and not self.is_file)

    ## model_load
    def model_load(self):
        self.device = select_device(self.device)
        self.model = DetectMultiBackend(self.weights, device=self.device, dnn=self.dnn, data=self.data, fp16=self.half)
        self.stride, self.pt = self.model.stride, self.model.pt
        imgsz = check_img_size(self.imgsz, s=self.stride)  # check image size
        bs=1
        self.model.warmup(imgsz=(1 if self.pt else bs, 3, *imgsz))  # warmup
        print("Inference Ready")

    def DataLoad(self, im0):
        im = letterbox(im0, self.imgsz, stride=self.stride, auto=self.auto)[0]  # padded resize
        im = im.transpose((2, 0, 1))[::-1]  # HWC to CHW, BGR to RGB
        im = np.ascontiguousarray(im)  # contiguous
        return im

    def xyxy2xywhp(self,x,h=640,w=640):
        # Convert nx4 boxes from [x1, y1, x2, y2] to [x, y, w, h] pixel where xy1=top-left, xy2=bottom-right
        y = x.clone() if isinstance(x, torch.Tensor) else np.copy(x)
        y[..., 0] = x[..., 0] * w # x
        y[..., 1] = x[..., 1] * h # y
        y[..., 2] = (x[..., 2] - x[..., 0]) * w  # width
        y[..., 3] = (x[..., 3] - x[..., 1]) * h  # height
        return y

    @smart_inference_mode()
    def infer(self, img_path, work_id):
        im = self.DataLoad(img_path)
        im = torch.from_numpy(im).to(self.model.device)
        im = im.half() if self.model.fp16 else im.float()  # uint8 to fp16/32
        im /= 255  # 0 - 255 to 0.0 - 1.0
        if len(im.shape) == 3:
            im = im[None]  # expand for batch dim

        visualize = False
        pred = self.model(im, augment=self.augment, visualize=visualize)
        pred = non_max_suppression(pred, self.conf_thres, self.iou_thres, self.classes, self.agnostic_nms, max_det=self.max_det) ## Inference Finish
        person_results = []
        for i,det in enumerate(pred):
            if len(det):
                for *xyxy, conf, cls in reversed(det):
                    score = float(conf)
                    class_index = int(cls)
                    x1 = int(xyxy[0].item())
                    y1 = int(xyxy[1].item())
                    x2 = int(xyxy[2].item())
                    y2 = int(xyxy[3].item())
                    w = x2 - x1
                    h = y2 - y1
                    area = w * h
                    if class_index == 3 and area > 500 and score > 0.6:
                        person = {'bbox': [x1, y1, w, h],'conf':conf,'index':i}
                        person_results.append(person)
        dt = datetime.now()
        p_cnt = len(person_results)
        if p_cnt >0:
            print(f"[rtsp][{dt}],    class:{class_index},    Count:{p_cnt}      Work_id : {work_id}")
            return person_results
fast api를 사용해서 main.py에서 이미지를 받아 사용할 수 있도록 작성했다.
@app.post("/object-to-json")
async def detect_food_return_json_result(file: bytes = File(...),work_id: str = Header(default=None, convert_underscores=False) ):
    start, end = torch.cuda.Event(enable_timing=True), torch.cuda.Event(enable_timing=True)
    start.record()
    image = Image.open(BytesIO(file))
    numpy_image=np.array(image)
    img = cv2.cvtColor(numpy_image, cv2.COLOR_RGB2BGR)

    result = model.infer(img, work_id)
    detect_res = result.pandas().xyxy[0].to_json(orient="records")  # JSON img1 predictions
    detect_res = json.loads(detect_res)
    return {"infer_time" : start.elapsed_time(end), "work_id" : work_id}
그리고 docker image를 새로 말아서 main.py를 실행하도록 작성했다.
FROM yolov5-fastapi:0.0.1

WORKDIR /usr/src/app

EXPOSE 18000

CMD ["python3", "main.py"]
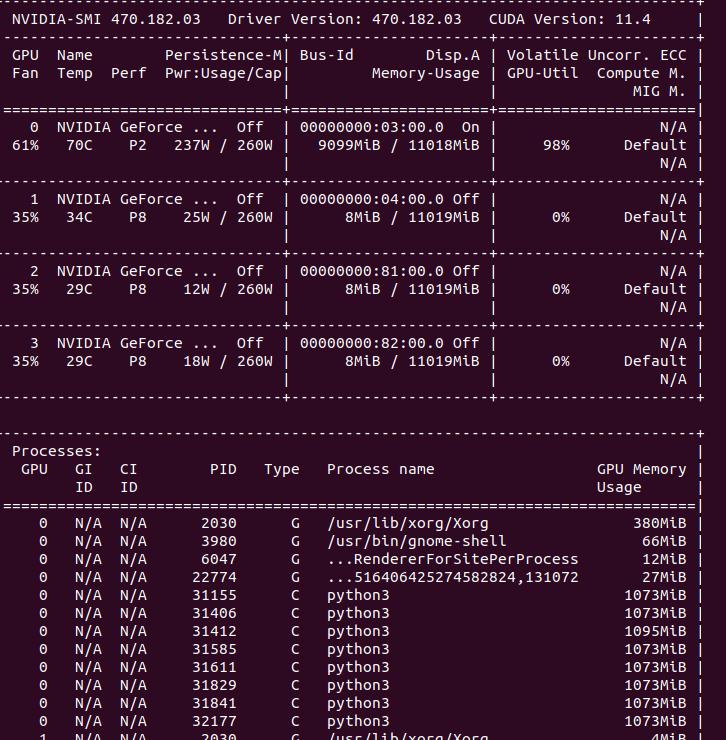
Pytorch 모델의 경우, GPU를 사용하여 model을 load시, GPU의 vram을 미리 할당하여 inference를 하게 된다. yolov5 service 파일을 구축하고 도커에 GPU를 전부 할당하고, python 파일을 실행하게 되면 모델 로드 시, 해당처럼 gpu0번에 몰빵되어 로드되게 된다.
이는 docker swarm을 통해 분산 inference를 실행하더라도, 전혀 효율적이지 않다. 그림만 봐도 GPU를 고르게 배치하고 싶어진다.

나는 이 방법을 python에서 gpu 할당량을 보고 적은 메모리를 차지하는 쪽에 각 docker의 device번호를 할당하도록하는 코드로 작성하였다.
https://velog.io/@claude_ssim/NVIDIA-GPU-%EB%B3%B4%EB%8A%94%EB%B2%95nvidia-smi
[딥러닝] NVIDIA GPU 보는법(nvidia-smi)
NVIDIA의 GPU는 많은 양의 연산을 빠르게 처리해줄 수 있기에 많은 연산량의 딥러닝을 하고자할 때 반드시 필요하다. 이를 사용하기 위해서는 nvidia에서 제공하는 GPU driver를 OS에 맞게 설치해줘야
velog.io
import nvidia_smi

def low_using_gpu_device(self): ## gpu count를 확인하고, 적은 메모리를 차지하는 번호를 반환
    nvidia_smi.nvmlInit()
    deviceCount = nvidia_smi.nvmlDeviceGetCount()
    freem = []
    for i in range(deviceCount):
        handle = nvidia_smi.nvmlDeviceGetHandleByIndex(i)
        info = nvidia_smi.nvmlDeviceGetMemoryInfo(handle)
        freem.append(100*info.free/info.total)
    nvidia_smi.nvmlShutdown()
    device_num = freem.index(max(freem))
    return str(device_num)
모델 로드시, 디바이스 번호를 줄 수 있도록 하였다.
    def model_load(self):
        self.device = self.low_using_gpu_device()
        self.device = select_device(self.device)
        self.model = DetectMultiBackend(self.weights, device=self.device, dnn=self.dnn, data=self.data, fp16=self.half)
        self.stride, self.pt = self.model.stride, self.model.pt
        imgsz = check_img_size(self.imgsz, s=self.stride)  # check image size
        bs=1
        self.model.warmup(imgsz=(1 if self.pt else bs, 3, *imgsz))  # warmup
        print("Inference Ready")

해당 방법처럼 고르게 분포가 된다.
'관련 이것저것 > docker' 카테고리의 다른 글
| [Docker] docker swarm gpu할당 (0) | 2023.07.23 |
|---|---|
| [Docker] yolov8 docker 설치해보기 (1) | 2023.01.23 |
| [Docker] Illegal instruction(core dumped) error 해결 (Jetson Xavier Nx) (0) | 2022.11.22 |
| [Docker] Could not connect to any X display 오류 해결 (ROS_Docker) (0) | 2022.10.23 |